Showing posts with label Quick Canoe. Show all posts

19 June, 2013

Pirogue: the story so far...


[CLICK ON IMAGES TO ENLARGE VIEW]

My canoe is a built from plywood. It's a Michael Storer's Quick Canoe DIY build.  The design is of a flat bottom pirogue with a keel running the length of the hull.

 It handles fine when I paddle or pole it forward. Since adding dual outriggers I'm pretty much comfortably upright. I built it for local use on very shallow estuaries and bays.

However, rigged for sailing is problematical. I'm using the sail from my old plastic kayak because I know how it performs but I'm having trouble turning the canoe into the wind, even without a sail up.        

Of course the sheer sides are a major factor  encouraging this handicap. But I'm wondering what I could do to counter that:

  • a steering oar?
  • leeboard?
  • deeper outriggers?
Any suggestions?
Discussion about this on Sailing Canoe regroup.(I'd like to thank the contributors).


18 June, 2013

Outrigger Design II : doubling up


After resupplying my build, I forged ahead a made a double outrigger today for the Pirogue.                               

Tomorrow I take it out upon the waters. [Click on image for enlarged view].

I think I have ticked a lot of boxes but I may not have engineered the design so that it actually works. It may do a couple of things but then there may be side effects. The floats could submerge and drag the craft sideways or over.The forces on the arms may be too great or they are too flexible to stand up to the lean and dip driven by wind and waves. On the other hand the floats may be suspended such that they are out of the  water and of limited balancing use.


But then I can always pull it apart and rebuild...

Anecdote
'Tis an interesting feature of the poling traditional that the preferred length of a pole used for pushing canoes and barges along waterways is 10-12 feet. So the marker, 'I wouldn't touch it with a 12 foot barge pole!" has substance. Having just created a 12 foot barge pole I know my onions. I should point out that I'm seeking to touch bottom and if you are , say, one day poked in the ribs by one end of my 12 foot pole you'll know that you are within my circle of trust. But I find travelling with a 12 foot barge pole to social events is burdensome.I used to use a 8 foot pole and 8 feet just isn't long enough -- if you know what I mean -- navigationally or socially. So I strung some tent stays together and if waterwise-ing it at 12 feet suits me, I have my eye on a lovely piece of Tasmanian Oak.


17 June, 2013

Canoe Outrigger Design

     
After an intense week fiddling with available materials I think I have settled on the engineering and design for my outrigger.    

It's an eclectic mix of 'stuff' and I won't be hazarding a ruling until it gets wet. The logic hopefully is apparent. It will probably be joined by another mirror image outrigger on the other side of the pirogue, but for now it's a single sided feature designed to ride  primarily on the lee side of the craft.

If it doesn't work as I hope, I'll tweak it. When you are using crutch arms and cable ties, bungee cords and swim noodles, fiddling with the design comes easily.  

My puppetry background,  and the materials I mastered via that DIY, is useful.

I spent a lot of time researching outrigger types from East Africa, through Indonesia, Malaysia, the Philippines and the South Pacific, and it seems (to me anyway) the parameters vary depending on preferred functional attributes and traditions. 

That I have a flat bottom canoe when most indigenous craft are rotund, and  often tree trunk carved, means that I'm dealing with my own idiosyncratic challenges. I won't bore you with the many variables I have discovered and the creative way different sea going cultures have solved their structural and functional problems. 

But let's just say this:I'm hopeful.

I'm not after speed, just stability in varying conditions enough so that my Pirogue and I don't capsize quickly, especially when I've got a head of sail...


11 June, 2013

Eureka! Pirogue-ing it with a bamboo outrigger to make a sailing canoe

I was out on the waters of the bay today a'paddling and a'poling. Not enough wind to experiment with sailing.    But the good ship and I got a chance to get to know one another.      

Our relationship is getting serious and we are going steady.

In my past few musings while upon the wet stuff I soon enough realized that I desperately needed to put an outrigger on the Pirogue.

But outriggers aren't self evident things.

I've been reviewing many styles of indigenous canoes seeking inspiration and some DIY tips.  Some cultures use two outriggers -- one on each side of the canoe -- such as the Indonesian Juking. Others sail with a single outrigger either on the lee side or to windward.

If sailed to leeward the outrigger is used as a float to prevent the canoe from tipping over in the force of the wind. But on a South Pacific proa the outrigger is employed as a counterweight to the force of the wind so it is sailed on the side the wind is coming from. It may have a ladder so that the crew can crawl out onto the arms and add their weight to the outrigger.

I decided I wanted to experiment with a single outrigger  and sail it to leeward.

But then I had the challenge of deciding how I'd create the outrigger arms. The complication is that with a single outrigger you need to curve the arms so that they run from the gunwales -- the top edge of the  sides of a canoe -- to the water line where you position your float.

I think you also need to allow  some flex -- not much -- just enough to protect your canoe's integrity from wind gusts or big waves. By lashing the outrigger to the canoe you allow for a bit of give.

It  is also necessary to be able to quickly dismantle the outrigger for portage.

While the base design seems simple enough, I had problems deciding on how and where I'd attach the outrigger to the canoe and what materials I'd use to build it.

So I kept up the Googling...and came across a design based on an ancient prehispanic boat excavated in Butuan, Philippines, carbon dated to around 320 AD.(see image above)

It was a revelation.

While the  hull is made from cut timber, what  attracted my attention were the ingenious outrigger arms: one straight bamboo cane which is used as a strut to bend another cane to the water line. 

I thought,"now that's something I can build in an afternoon. Just bend bamboo canes and strap the elements together."

So tomorrow I'm gonna harvest myself some bamboo.

For my float -- since it is no longer 320AD -- I'm planning to ram a bamboo cane inside an extended swim noodle. 

I think I'll get more floatation for less weight from a swim noodle.

If this rig doesn't work I'll just make myself a simple double outrigger setup like this:


Keep it simple and make it cheap is what I always say.  


06 June, 2013

Pirogue-ing it by paddling my own canoe

I took the Pirogue out for its second trial today.

Glassy sea. No wind worthy of the mention. Outgoing tide. 

Great conditions for paddling your own canoe (especially if you -- ie: I --  need to negotiate a learning curve).

To my surprize both the captain and his ship performed  better than expected.

The craft paddles very well and I get more speed and greater distance per stroke than I did from my old plastic kayak -- The Flying Crutchman. I covered a good distance offshore seemingly in navigational comfort. 

After dipping my oar for a few kilometres I stood up, picked up my bamboo pole and started polling over the shallows. 

Effortless motion. ( I do love poling so. ) I was ski-ing on water.

Once you get a feel for the pitch of the craft -- and the way the weight shifts -- the balancing you have to master begins to register and poling is a nice change from paddling.

Although I may have my seat a tad too high I value the role my buttocks  play in the balancing act I need to negotiate as part of my paddling efforts. In fact, I suspect that I may be able to sail this pirogue without recourse to an outrigger by using weight shifting skills alone. 

That will be a challenge for later in the week:sailing.
I could also do with a longer paddle blade given my height above the water line.
Nonetheless, an outrigger it shall have. I am pondering my design options. An outrigger will make paddling and sailing that much less threatened by capsize-ment. 


18 May, 2013

We launched the Pirogue today


Well, it happened.

We launched the Pirogue today.

With winds gusting at 16 knots it wasn't a pleasant experience. We capsized several times. and had a lot of trouble steering against or across the wind.

The sheer sides of the build served as a wind catcher and the flat bottom made the craft very tippy -- especially with us novices in charge of it.

I'd forgotten how tippy canoes can be. I need to train up so that I can get my balancing act together.

Of course the thing could float in a saucer. It doesn't so much sit in the water as on it. Thus the ready tip. But with the wind behind us we moved quickly along the coast but did not have the skills to paddle back.

But hey, towing is easy. 

This image below  from the Toledo Community Boathouse shows how high this design rides in the water.It skims the surface.


The message is self evident: if I want to do what I planned to do with this canoe, I'm going to have to add an outrigger sooner rather than later. I'll work on my balancing and seamanship but I'll still need the means to confidently stay upright...and dryish. 

I'll paddle some more in calmer conditions -- that is, without the wind blowing the canoe astray -- but I suspect that a bit of remodelling is in order.My lack of canoeing  experience in boats like this shows. Indeed the difference between flat bottom boating and the curved type was driven home each time I was dunked. There's this threshold  that if reached-- over you go. 

But an outrigger -- one at least on the lee side -- should put things to right often enough. 


14 May, 2013

The Pirogue is ready for its maiden voyage

...Just as soon as the paint really dries. Then we see if the new canoe floats and performs. We paddle it. Sail it. And then move to Stage II: a bigger sail and an outrigger.

Click on image for enlarged view


11 May, 2013

DIY Outrigger thoughts: crutches + swim noodle?


I was fixing up my mast cradle ready to see how it may go on the new canoe when I had a thought.     

An epiphany.

My cradle is made from crutches  and works very well indeed.   Crutches are engineered to be sturdy, durable and weight bearing as they are supposed to carry the full weight of an adult human.

They do this so well that the design does not vary although the build materials do. 

So my thought, following on from my last post, was to use the stems of  pairs of crutches  to construct my outrigger. There is a lot you can do with second hand crutches as I have discovered by experimenting with the material on my original canoe -- The Flying Crutchman (so named for obvious reasons).

Second hand they  are cheap, despite their quality and engineering. While people keep breaking their bones or twisting they ankles or wrecking their knees crutches will remain with us. We are indeed talking about a sustainable resource.

So the deal is that I'll employ the curve on the crutch stem to accommodate the fall I need so that the outrigger  arms can reach out to the float -- the ama -- resting on the surface of the water. My initial observations suggest that the drop may be just enough to hold  the ama parallel to the water line on the canoe. After all, that's the main deal with outriggers: they are supposed to keep the canoe upright in the water despite wind or waves.

The ama itself can be made from a swim noodle inside which  further crutches are rammed. By harnessing the curve in the crutch stem, I should be able to make the ama rise up at its two ends. Thus enabling better cutting through the surface of the water.

  • the outrigger arms are lashed to the boat
  • the swim noodle ama is lashed to the outrigger arms
Everything is very light and can be quickly dismantled for easy portage or for swapping sides. The three bits would fit in the canoe with  leg room to spare. If I consider I may have strength issues or heights or falls I need to make up, I simply add more crutch stems or another layer of noodles. 

You'll find no better floating device than a swim noodle. Their one major drawback is that they deteriorate with too much solar radiation.

When I consider my options -- in effect I'd have to harvest trees or tree branches that offer a naturally grown curvature suitable for outrigger construction -- I think this mix of materials is practical and very cheap. 

My design habit is to build and see -- and in the case of the crutches, I'd lash the stems together with zippy/cable ties and tape,  and use bungee cords to attach the crutch arms to ama and canoe  to arms. After experimenting to improve the design I'd later use a  permanent fixing like flexible wire...

Afterward
On my morning scoot I first touched the sea at the Kunde St boat ramp which is a gap in the sea wall. Stiff south easterly washing up on the run up tide.I know from experience what that would mean after a day out on the water. It would mean surfing onto the cement ramp, disembarking quickly and finding a way to secure the canoe while rushing up the bank for the cart. In the meantime the craft grates itself on the cement.
Advantage as a launch site: 850 metres from home. It has been my standard launching place for my sailing kayak -- 'The Flying Crutchman' -- for the past 2 years.
I scooted off and headed north to McGregor Terrace and sat on the beach (pictured at upper right) to contemplate existence. You access the sandy beach through a grove of Cotton Trees and the nearby eucalypts are the highest of any foliage in town. Easy beach access. Golden sands (these stretch north for another 5 kilometres). Much better launch site and certainly a safer way to return a canoe to dry land. I can also do any rigging that needs doing on the sand before heading off and disassembling same comfortably and in my own good time on my return. I can lock the cart to a local tree while I'm out to sea.
Disadvantage as a launch site : 1.70 metres from home.
Methinks I'm gonna be entering and leaving the water at McGregor hereafter.


Ready to go (soon)

Half way through the painting
I finally -- well, almost -- finished the painting of the canoe.

In deference to what-may-be  the fickleness of modern house paints I'm going to wait the best part of a week before I immerse the hull in the sea.

Launch. Trials --you know, paddling about hither and yon. Getting the cut of its jib...

"Thats' the way to do it!"

The garish colours are the traditional Punch and Judy colours so this is a carnival or cartoon boat.  Out at sea you'll see it coming from a long way off. Yellow against the blue sea. 

 And still not rigged ready to go: the sail.

After I get a feel for the craft I'll transfer across my old sail rig and canoe sail the craft. Given the size of the sail I have I expect to be able to sail OK without being dunked. Depending on the conditions of course.

I love my sail. The rig works fine: tacking -- even against the wind... But I think I can 'add more sail' to my mast and I want to change its pitch  so that the paddler in the front of the canoe isn't cramped or expelled from their seat because of the sail foot. 

So I'm thinking proa sail. 

Gary Dierking's excellent proas
Traditional Proa sailing is complicated by the pivoting of the mast which can be rocked back and forth depending on the prevailing wind direction. But if you don't pivot what interests me is the way the sail runs away from the deck and its bottom foot is not pitched parallel to the water. Methinks: more head space under neath. More room to move about.Better vision. 

Outrigger

Of course if I add more sail I may become a bit tipsy . I could learn to sail with that in mind...or/and I could add an outrigger. 

I've just come across a simple outrigger design which is in my crude carpentry reach: three bits of wood strapped together. 

This is my ideal. The comments section explain the rig  in more detail.

So what I need -- and in effect all the traditional outrigger sailing canoes of Oceania are built this way -- is two long branches that bend enough so that ama (the outrigger  float) runs parallel to the canoe hull at the water line.  

You need to be able to dismantle the rig for portage -- so you strap it together -- or for swapping the outrigger to the other side of the canoe  as my mast will be  fixed at the bow.  


06 May, 2013

PIROGUE: Bogged, sanded and ready to be painted


Soon enough in the water...

The sealant is still coming together. The plywood  is marine grade -- not your furniture stuff. The 2 pack glue mix I used is BoteCote . That plus screws, woven tape and temporary nails hold the bits of wood together and the canoe is also coated in a layer of BoteCote. But I'm gonna use house paint sealant (x3 coat to the bottom/ 2 coats to the inside) ontop of that and Dulux Weathershield to finish off.Marine paints are far too expensive and many wooden boaties use house paint even for craft constantly in the water.

The canoe is made of plywood. Three sheets of plywood cut to shape into 6 templated sections and stuck together. It's a smart put together and I wish I was a carpenter (I'm more or less skilless) as I would have had more pleasure in the fit up. But it s a surprize to consider its lines given what it is made of and how it is put together. Wooden boaties and boat builders are outside my experience.

Would I do it again -- given my ignorance?
Pacific Islander motif that will ride 
on each side of the bow. The Pirogue 
will be painted yellow.

No. 

I was totally dependent on a skilled neighbour who had a professional background in these things. He even began his working like as an apprentice boat builder. But then as I carefully sand the thing I get to note our mistakes -- not just mine. After you've built a few boats I'm sure the skill curve rises sharply and maybe you can't get enough of the sawdust. 

But me, I've got what I wanted: a serviceable canoe that

  • (touch wood) floats
  • is made of wood so refits are easy
  • is big enough to carry what I want and sail but not too large that I cannot portage it
  • is of a design that has further hardware possibilities (eg: bigger sail, outrigger, etc)
I estimate that the number of hours we would have  invested overall to complete the build will amount to something like one work week -- 5 days. But because of this and that complication the build took much longer. Of course if you know what you are doing and have done it before it would indeed be a very quick canoe.


02 May, 2013

The Pirogue comes home and will take me many great places


When I was 8 or 10 I got a 'paddle board'. It was a floaty thing  made up of two pieces of plywood separated by air.

On Summer holidays I was exposed to paddling  sit-in kayaks (also made from plywood) along the Mornington Peninsula coast.

So by the time I got into my teens -- with 60's surf culture all around me --all I could think about was going offshore.

So I graduated to a banana ski board, which a chippy in the neighbourhood built for me. I had saved up all the cash to pay for the build. I went long distances with that boat. I explored the coast, headed offshore, surfed it ...it was FFUN!

The 'ski' was something like this -- a flat deck with stirrups:


Twenty plus years later I took up canoeing and paddled Canadian style canoes down a few  of Victorian's rivers. 


But I was, by disposition,  a salty dog -- and while I like the fresh water  rivers with their meanderings and steady currents, my bodily essences are salt sea anchored.


So thirty years later... I get myself a plastic sit-on-top kayak and paddle forth (pictured right/below)  upon my local  bay. I even use it to learn how to sail.
So it goes...

And so we  come to today. I'm no longer a boy. 

But TODAY I have a new boat! A wooden craft.

Not quite finished and nothing snazzy. But I'm in sync with that  past. I think this pirogue will take me many great places out to sea and along the coast... and I live but 500 metres from the sea.
pirogue is a small, flat-bottomed boat of a design associated particularly with the Cajuns of the Louisiana marsh. In West Africa they were used as traditional fishing boats.[1] These boats are not usually intended for overnight travel but are light and small enough to be easily taken onto land. The design also allows the pirogue to move through the very shallow water of marshes and be easily turned over to drain any water that may get into the boat. A pirogue has "hard chines" which means that instead of a smooth curve from the gunwales to the keel, there is often a flat bottom which meets the plane of the side. The pirogue is usually propelled by paddles that have one blade (as opposed to a kayak paddle, which has two). It can also be punted with a push pole in shallow water. Small sails can also be employed.
Ironically I spent a lot of time paddling around yacht clubs when I was growing up. But I never wanted to  join them -- the 'yachties'-- (although I was  asked). They were foreign to my penchant to simply mess about in a boat for the sake of being on the water.I didn't fish. I didn't sail. I just wanted to 'cruise' -- hang out along the coast. 


28 April, 2013

Pirogue (almost) a go go.

'Tis hard to believe but I'm 'that' close to finishing my canoe build.

I have been obsessed with  creating a canoe for years but could never muster the confidence to proceed. 

But there you have it: my canoe exists (although seafaring it is still an untested option). 

En route I've adapted the original plans to suit my needs.

The Seats

I had a sinking feeling that in raising the seats level with the gunwales I had committed a design flaw. But I see that many pirogues -- flat bottom canoes -- do indeed seat their crew  level with the top of the craft. 

My thinking was that given my often delicate -- stiffness prone -- condition I could do with the leg room; and anyone who has ever paddled a kayak will tell you, sitting  on the 'deck' to paddle with your legs at 90 degrees in front is uncomfortable. So I thought "go higher to raise my comfort quotient."

So I did...

Canoe seats  are usually designed low so that there is less  tip as the paddler or passenger's centre of gravity  shifts with the strokes. But then mine is a flat bottomed canoe  so the side to side thing isn't a major issue (up until a point, of course: the point where the water starts coming over the side).

From experience, I also know that the lower you are in the canoe in the water the less you pick up wind drag. This is an advantage for kayaks being so low in the water: they don't present a large target to the wind. 

My canoe, on the other hand, is a craft I hope to sail more often than not so wind drag  is kosher.

The other advantage of a high seat is that it's easier to pole the canoe without necessarily standing (gondolier style) . In  my local shallow waters, I love poling: pushing myself  forward with a long bamboo cane along the sandy bottom. It can be faster sometimes than casual paddling. Standing while polling has  ergonomic advantages especially when you poll left and right of the canoe as you have to pitch the long pole over the craft to swap sides. This is partly why often boats that are poled from the stern where it is narrowest.


Just as stand up paddling  has taken off as another use for surfboards, canoe poling has its new breed of adherents.

The Sail Rig


As yet we don't know the cut of this craft's jib but the canoe we built -- Michael Storer's Quick Canoe -- can be sailed.

I've taken the sail rig from my old plastic kayak -- The Flying Crutchman -- and worked out a way to attach it to the pirogue. I think I've dealt with  the stresses a stiff wind will have on the hull.

I think so/hope so....

Indeed my old sail looks small when its unfurled atop this new canoe, so I hope to make another rig with  larger sail area.

I'm very happy with the design I use -- taken from Bill Mantis' work up (left). There's a functional logic in the rig despite its lack of a clean line or romantic silhouette.

I had trimmed my original sail but when I get around to making another rig I want to master this shortened sail  first and learn from the trials.


How much sail? How far back?  What skills will I need to handle tacking? What limitations are imposed by my flat bottom? Will I have to consider attaching an outrigger or leeboard at some future stage?

If I go the outrigger route I have an inspiration from the Cook Islands. As  Gary Dierking explains (check out the images):
Aitutaki Paddling Canoes:  I took these photos during a visit to Aitutaki in the Cook Islands in 2008. Some are dugouts but most are flat bottomed plywood. They are mostly used in the shallow area of the lagoon and are pushed along with a long pole.
Martin Roberts  has also added an outrigger to his pirogue (above right). But then outriggers are another world altogether, I'm sure. With an outrigger -- assuming you sail it correctly --  you get to handle more chop and stiffer breezes without capsizing. But sailing or paddling with an outrigger would be a novel experience...

The Aitutaki Lagoon
is big (14 km north/south)


22 April, 2013

Quick Canoe -- maybe not so 'quick' for some but do-able


I've read the plans for constructing Michael Storer's Quick Canoe many times. But my technical handicap is such that I was not able to comprehend them.

I am not of the DIY persuasion when it comes to wood.

I have had no experience whatsoever -- nor have I been trained -- in carpentry. So my hopes of building a wooden  canoe were  frustrated until I teamed up with my highly skilled and generous neighbour Max.

And Voila! Maybe Max  did the lion's share of the work and maybe Max was the only person who knew what he was doing but the craft looks almost ship shape and Bristol fashion.

Perhaps I could do it again by myself...but then why should I do that? One  canoe is enough. If you know what you are doing, second time around  I'm sure the project would be 'quicker'. 

You need tools I don't have. You need skills based on workshop -- shed - experience I've never been exposed to...but the making of a canoe is indeed a do-able thing.

At least a three sheet plywood canoe like this one..so long as you have a neighbour such as mine.

Ask me how -- I've more or less done it
  1. Move next door to Max.
  2. Say you'll do anything Max wants in payment for his skills and tools: quid pro quo.

There may be two kinds of people in the world: those who can hammer in a nail -- and those who can't. I'm in the latter company. I have construction skills but not with wood. I guess it's a material thing. It has never been my medium. Give me a bag of cement -- I use to work pylon construction -- and I'm away. 

I can sculpt in clay or papier mache. I can build puppets and masks. I can landscape in mode of Capability Brown ...but give me a piece of wood...and I'm all at sea. 

But then, there you have it: I have now got myself a wooden canoe which will soon be ready for painting. 

Once launched I will tackle the challenge of rigging the sail by relying on whatever skills I may now possess.
The irony is that I wasn't sure that I could even paddle a boat because of my chronic illness. But two years ago I bought myself a cheap plastic kayak and proved to myself that I could indeed mess about in  a boat. I rigged it  and taught myself to sail. Yes indeed -- The Flying Crutchman has taught me heaps. But I realised it has limitations -- being, as it was, made from plastic and short and stubby. So I started to consider my options and counted my pennies. As it turns out, this project will cost me under $500 and the canoe I'll get would have a value of over $1600 -- given current prices. I'm happy with my choices.


26 March, 2013

All at sea in a flat botom boat.


Indications are that sooner rather than later I'll be all at sea in a flat bottom boat.

In pursuit of such nautical means it helps to have a neighbour who:
  • has a workshop with tools
  • is retired
  • began working life as an apprentice boat builder then after years in the Navy  air arm,  built gliders out of wood.
  • unlike me, can read a set of plans.
How I even imagined  I could build this myself I don't know  as my carpentry skills and chippy experience are zilch. 

But there you go: geographical happenstance in da hood. 

Flat bottom boating is an interesting aspect of water transport. There are many examples world wide of flat bottoms being preferred to curvy ones: barge, bateau, flatboat, gondola, jon boat, keelboat, pirogue, pram, punt, scow and Trow, etc.

My favorite flat bottom canoes are the Aitutaki in the Cook Islands. Simple. Functional.They're polled -- punted (pushed along by a big stick along the water bottom)--  and I like to punt. 

The advantage with the horizontal underneath is that you are less likely to run aground and your deck is more stable in flat water than with a curved hull. So standing up is allowed. 

I'm using a brilliant Michal Storer design. Michael is an Australian  boat designer and builder who has a dedicated following internationally, esp in the US. 

The design templates a lot of use out of just three pieces of plywood.

But flat bottom?

My intended use is in very shallow coastal waters and estuaries. Tidal creeks. As the tide falls I'll have to manoevre over many sand bars. I also don't expect a lot of wave traffic..
I'll be adding sail and that should be interesting. I know the sail rig works fine as I've used it on my beamy plastic kayak --  but if I'm gonna be tip prone I may have to add an outrigger or maybe a leeboard.

But I'm thinking that going without these add ons makes for a more challenging sailing adventure.

With a length of 4.7m (15ft 6ins) and weight of  23kg my flat bottom boat -- it's a canoe (design pictured right) --  fits my requirements very well indeed. (It looks stylish, don;t you think?)
  • a two people, two dog, watercraft
  • plenty of space to carry stuff -- indeed a lot of stuff.
  • big enough to stow away a sail.
  • long enough to sail without having to add extra bits. Really a sailing canoe has to be at least over 12 feet long. That's something I've learnt from my own messing about.
  • "easy", cheap and quick to build.
As for flat versus V here's an interesting discussion from Voyager canoes about stability:
The flat bottom will tend to remain parallel to the surface of the water, and just below it, (unless you are carrying a very large number of helium balloons).  If you are canoeing on calm, flat water, then the flat bottom will make for a much more stable ride.  You can shift your weight to greater extremes and not feel that the canoe will rotate under you and tip you out.
Another way to look at it, is that it is easier to keep your centre of gravity over the flatter boat whereas the rounder hull seems to slip out from under you, leaving your centre of gravity over the edge.
If you are in rougher water, the situation is more complex:
If you are on the side of a wave, the water surface, and thus the flat bottom of the boat, may be tipped at a considerable angle.  If you are sitting perpendicular to the bottom, then you might find it very difficult to keep your centre of gravity over the boat. (Depending on the severity of the wave and the height of your seat)
The round bottom boat will tend to rotate so that the water is higher on one side than the other, but it means that you will find it easier to remain vertical and keep your centre of gravity over the boat.
If the boat takes on water, the water will form a shallow layer across the entire bottom of the flat bottom boat, but it will tend to concentrate and be deeper, down the centre line of the rounder boat.
In flat water, this means you have a greater variety of depths of water to place your feet in, which may not be of much concern to you or your feet.
In rough water, the deeper water around the centre line will tend to pull the centre of the boat down, rotating the boat to keep the bottom down.  This will tend to keep the paddler above the centre line of the canoe and in a reasonably vertical position.
As the flat bottom boat tips with the surface of the wave, the shallow pool will suddenly rush to the lower side, and the weight and momentum of it will increase the tendancy to tip.  As the boat goes over the wave and tips the other way, the water will suddenly surge to the other side.
The momentum of the water will act to enhance the extremes of the boat motion which will force you into a position that continually places your centre of gravity beyond the edges of the boat.  This, of course, increases the likelihood that you will get to use the PFD that you so-wisely are wearing.
The water in the round boat will also oscillate around the centre point, but due to the shape of the hull, the oscillations will not be as severe and the boat will have a greater tendancy to keep its occupants in stable positions.
In reality you will select a canoe that best suits how you will use it, and it will likely be a compromise shape, between the extremes.  If like me, you like to glide through the backwaters on a calm day and examine the flora and fauna beneath you, you will select a flatter canoe.  If you like more adventure, or perhaps you want more speed, then you will want a different style.
The accompanying diagrams are HERE.


24 November, 2012

The Plywood Saga opens the Quick Canoe adventure


Finally my plywood has arrived. What a saga!

On November  1st --three weeks ago -- I purchased 3 sheets of 240x1220 ply loaded them onto my car roof rack and left the plywood shop.
But I had to return  because the wind  had risen and  the chances of keeping the wood sheets attached to the car roof rack were slim. We were poised for something to take off.
When I had rung the supplier about our problem they said they could deliver the items to  my house 40 km away. So we decided to return to  there and do that.
But when we got back to the shop we were told  that they don't in fact  deliver to where I live . We tried to strap the sheets onto the car securely but without success so the supplier told us, that they'll deliver the wood to our district (not our town) and I could pick it up there.They'd ring and arrange a rendezvous.
So I paid for a delivery (by cash) and left.
Then I just waited. I fell ill during this time and besides I didn't want to collect the wood while the winds were still up...and it has been very breezy indeed. So I didn't fret over the issue of the wood.
I also was in no special hurry for the ply as I needed my neighbour available to cut it to size...and he was holiday prone.. 
But today --after further chit chat -- the wood arrived at my doorstep. I am now the proud owner ...of wood -- three sheets of wood that need to cut to template size by an electric saw.

So I'm poised on my Quick Canoe build. I'm at the  beginning of a task for which I  have no skills whatsoever.

How the piece are supposed to look when cut to shape.
I'm anxious and will  be calling on a few favours to get me through the build. My son is my chippy partner and investor...


06 August, 2012

The Quick Canoe -- 'tis possible I could do it in my own good time, if I take my time?

The Quick Canoe
Well, my health has picked up and while I'm always gonna have issues the  in-the-body experience is beginning to turn in my favour.

Hallelujah brother! Praised be my physiology...

I also suspect that no matter how much I tweak my Flying Crutchman project I'm still gonna be left with a temperamental slow sailer.

So I've turned back on myself and will proceed with building a Michael Storer Quick Canoe .

That I have no carpentry skills is, I grant you , a handicap. But I figure that if I can get my retired aeronautic engineer neighbour to cut the wood for me -- on his electric tool set thingy -- all I have to do is put the pieces together and give it a slap of paint.

Easy? Perhaps.

But then why not give it a try, says I?

The properties of import are  that a canoe made from plywood is lighter than one made from fiberglass, will avail itself of easy rigging and adaption by dint of drilling holes in wood, the design tracks better than many plastic canoes and I get to link up with a community of Quick Canoe enthusiasts.

Flat bottom outrigger canoe:Cook Is
The drawbacks supposedly are that the design is a flat bottom and I want to sail on the sea. However, the doyen of outrigger sailing canoes, the New Zealander, Gary Dierking, has designed a fast outrigger build  that has a flat bottom so I reckon that if push comes to capsize,  I'll just add an outrigger like these cute numbers from the Cook Islands, Gary talks about here.

Another drawback -- supposedly -- is that the hull is open. Well a lot of sailing in canoes is done in open hulls. If the hull is often swamped then all I need do is add buoyancy forward and aft. I could even include chambers in the original build.

Michael Storer is an interesting guy -- not that we've met. He is a South Australian but his boat design following is big time in the United States. His philosophy of living permeates the concept of the Quick Canoe as here is someone who likes to keep his footprint small.


12 November, 2011

Paper Canoeing


Still fiddling. 


Made up another canoe model to check out the way the Quick Canoe sheets of plywood come together ...again.

Cut it wrong and the jigsaw build doesn't work.


Nonetheless, the 4.7m 'may' support my 3 metre/45 degree angle mast and sail without being determined to tip. I was surprised how little lateral fall I could get by pushing the mast -- a pair of sate sticks -- left and right.


Quick Canoe Flickr sets
If I cut the panels correctly -- and each side and the bottom of the hull is made up of two template panels each which are then abutted and joined -- then anything else in way of wood is a fixture: thwarts, keel, mini decks, etc.  The magic of the design lies with the plywood cuts and the addition of a keel. 

If I have stability issues then I add an outrigger. In effect I'd join my Pacific brothers and sisters afloat with an ama  (outrigger float) in tow.

What I'm interested in doing is merging the advantages of a pirogue -- shallow water canoeing, stable deck, carrying capacity, easy cheap build -- with what I have so far learnt about sailing in shallow coastal waters among shoals and the odd bit of chop. 

At just under 5 metres long and with a flat bottom this canoe is a sleepover (with the sail as a shelter).


03 November, 2011

Quick 'paper' Canoe

Moving into 'build' mode. I shaped some stiff A4 paper into Quick Canoe layout. Using Michael Storer's Quick Canoe plans I was surprised how few segments make up the DIY build.

If I cut the templates accurately  out of plywood then it would be  a simple matter of  gluing them together. Even a  carpentry fool like myself could manage that -- so long as the shaped cuts were true.

I built the paper model in a few minutes with some very unsticky tape. 

The Storer Quick Canoe is really a flat bottomed canoe -- a Pirogue, esp like the Louisiana Pirogues -- with a single stem piece of wood keel for better tracking and stability. It's a very simple design but one, despite the trade offs, that seems to  perform well.

I am engaged...
IS THE PIROGUE RIGHT FOR YOU?
If you need to get to areas quietly and with little effort, this is the way. Keep in mind, pirogues, TRUE pirogues, are "tricky". If you have never been in one, you are in for a treat. It takes a certain learning curve that is best learned in warm weather! But once you get the hang of them, they will take you in 2"of water where no canoe, kayak, or other duck boat will go, or glide down a bayou for what seems like forever with one stroke of the paddle!

27 October, 2011

Budgeting the Quick Canoe. Dealing with the challenge.

Quick Canoe being built
Since I have decided to actually try to build myself a boat, the handicap of my abysmal carpentry skills haunts me. I do not have hammer and nail confidence  -- and no carpentry background -- at all.

So I am researching and engaging with the challenge that I have set my self from as many angles as I can muster. I project myself into the hands on future trying to psych myself up.

My first 'build' will be a cardboard model and if I can  make a craft with tape and scissors  out of a manila folder, maybe I can confront the wood some time thereafter.

The Quick Canoe  is a simple to build flat bottomed boat, similar to a pirogue.  How a 'pirogue' differs from a 'canoe' is something I'm not sure of as construction of a 'flat bottomed' canoe seems to parallel the ways and means of building a pirogue -- and bateaux and pirogues are the easiest DIY builds you can tackle.
Pirogues can be really fast to build but a good pirogue won't have the performance and ease of paddling of a good canoe. But you can carry a bigger payload and seat people where you want. Their surface area makes them heavier than a canoe.Canoes are less stable than pirogues but the upside is better directional stability and less paddling effort and less chance of catching the wind. They do have a lower payload than a pirogue....Canoes and Kayaks endeavour to be as close to the water as possible consistent with staying above said water.A canoe will have a lower topside than a pirogue and most kayaks will be lower than the canoe.Additionally a well designed canoe or kayak usually has a lot of hollow in the entry which acts as a big fin at each end of the boat.If you have ever paddled a canoe that blew around badly then it didn't have enough of this hollow.This is why transom sterned rowboats often have a skeg...Pirogue doesn't have this sort of refined shape. Putting the stem down in the water is bad also because it will increase the drag. So a pirogue is between a rock and a hard place. But geez they can be quick to build. (Michael Storer)
A Louisiana classic Pirogue
 I guess it's all about the journey? Build it and see.

Anyway I was working up my costings and checking my supply lines  so that I estimate that to build the Quick Canoe from the plans I already own  will cost me around $350-400. 

That's a cheap boat. 

The main hit is the price of the plywood and the glue coating. I'm sure there are cost cuts I can engineer.

Bolger Sailing Pirogue
Since I wanted to sail the thing when I had completed the build, my intention is  to use my present rig and just attach it to the QC. Then start tweaking the setup so that I don't habitually capsize. 

Since flat bottom-ness is a cruising issue under sail I've been researching what you can do with a pirogue -- and people do sail Louisiana style pirogues and the indigenous pirogues of Madagascar are standardly sailed. 

I also suspect that there is an innate preciousness in the canoe building community which insists on rigorous functional utility and detailed design specifics. 

Whereas I tend to embrace limitations of anything as a challenge to accommodate to and work around...and  darn good excuse to mess about with. 

There is however a design for a drop in sail  for the Quick Canoe.

My present sail rig is very different: a lateen sail on a proa style mast at a 45 degree angle. I'm hoping I can use the same means to attach it to the future hull  by exploiting a carry handle on the bow.  Works a treat: carry handle a a pair of crutches. I hope my centre of effort isn't located such that it will tip the canoe. Since my present paddleski is flat bottomed in a way -- being beamy -- I'm estimating that I have enough leeway in this future marriage to play around with.

24 October, 2011

Sailing a plastic paddleski and moving on

Since it was a gusty onshore wind today -- somewhere over 10 knots -- I went sailing on the paddleski with the latest design option for my steering oars.

The tide was way out and with the shoals close to the surface there was a lot of white water making for a very wet ride with at times 30-40 cm waves breaking over my sit-on-topness.

Everything worked. No dramas...but...

I think that after so much of my fiddling and rigging I can begin to step back from this project of turning a cheap plastic paddleski into a sailing canoe.

Learning to sail. 

En route these past so many months I have taught myself to sail. From knowing nothing and by negotiating wind and tide as a series of challenges I needed to surmount, I've gone from pig ignorance to a working relationship with the  gusty elements.

The research I've had to invest, matched with so many 'trials' upon the water has been an apprenticeship in how  to sail.

I'm still a beginner, a novice, of course --  but I at least know my way around a boat and its rigging attributes.

The sail rig

From knowing nothing about sails and rigging, the fact that I had to build my own mast and sail, adapt and attach it to the craft  has exposed me to the wonders of sailing motion. I am amazed how effective my settee sail hung from a mast at 45 degrees is. Cross wind, against the wind, downwind...I am 'blown away' by how efficiently my rig can harvest what breeze  there is on offer.

Given that I started 'sailing' with a golf umbrella -- which can only be used downwind -- the engineered sophistication of real sail design  comes as a bit of a shock.

Steering/Tracking

While my sailing rig is a delight my ongoing problems with steering my paddleski more or less undermine the whole shebang. Finally I have settled on the right length and blade drop for my pair of steering oars so that I am in control of where I actually do go.

However, my paddleski is designed as a beamy stable platform which unfortunately tracks terribly. So despite all the energy I can harvest from my wonderful sail I am spending it wastefully moving the beaminess of the craft forward.

In the situation like today where I was buffeted by so many white caps breaking along my windward side,  the force of the wind harvest was not efficiently  translated into forward motion. The craft performs much better when there are no breaking waves on the sea's surface. So offshore winds, winds from behind...etc  are the only ways to compensate for its laboured forward track.

Steering under gusty conditions is a lot of hard work as I always have to compensate for the shortness of the hull by arduously hanging onto the steering oars and use my strength against lateral forces.

The paddleski is a stable platform that will bear up under a good weight in many conditions -- but sailing it ,  as well as paddling it, won't get you anywhere in a hurry. Paddling is fine -- that's covered in its original design.  It may not track with the best canoes but you can still paddle it from 'a' to 'b' so long as 'a' and 'b' aren't  a Marathon distance  apart.

So the paddleski is my introduction to boating and still suits my offshore fishing requirements and paddling excursions...but as a sail boat, it hasn't got a bright future.
I say that because I suspect there are no further tweaks I can engineer to improve its performance.I may have converted a paddleski into a sailing canoe  but my base craft has limitations.
That suggests to me that maybe for my sailing requirements it's time to move on.
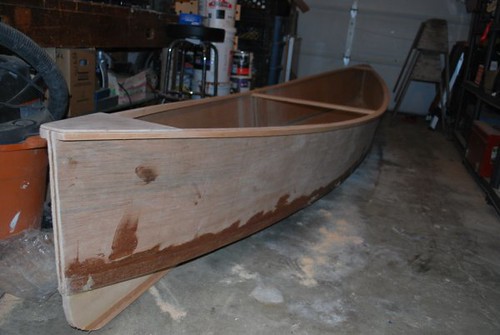
The Quick Canoe

This is where the Quick Canoe comes in. I am going to build myself a plywood canoe using plans by Michael Storer. That's my next major project.

Since I already have a sailing rig -- once I build my canoe ( huh! easy peasey, right?)  I adapt my present rig to the new build and ... sail away.

As I do so, I apply all the principles I learnt about steering oar navigation. (this is  topic -- rather than rudders that interests me.)

I'll continue to sail about with the craft I've got while I  handyman this project.  The quick canoe is supposedly a 4.5 hour build but with me, there's the rub, as my carpentry skills are non existent.

Need I point out that my current rig is held together by bungey cords and plastic zip ties!

'The Flying Crutchman'

However, assuming it happens, and I actually build a canoe that floats then I apply all the stuff I learnt from my paddleski sailing to the new craft. I for instance, extra rig it with crutches.

With crutches?

My rigging for the paddleski in both sail and steerage is made from three sets of crutches. The mast is locked to the craft -- stepped --  by a pair of crutches. The mast is held at 45 degrees angle by a pair of crutches. The shafts for the steering oars are made from a pair of crutches.

$4-5 a pair at local Op shops.

They are ideal: tooled and engineered to support the significant weight of crippled humans, and freely available as boating accessories.

It's not my invention as a name  but this build may finally be launched as  "The Flying Crutchman".

A future craft

Granted that we aren't there yet but since I like to get way ahead of myself I like to project into the future.
  1. Maybe I get to apply many uses for crutches on the new craft : rigging, steering -- and , if necessary -- using crutches as supports for the ama on an outrigger.
  2. Given that I'll be open canoe sailing  (the paddleski is an enclosed sit-on-top) I get to add buoyancy devices for those times when I will capsize.
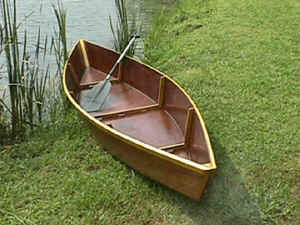
  3. The new craft will be longer [ Length – 4.7m (15ft 6ins) ] and will carry two people and their gear  so I get to do more and go further than with what I've got. Camping trips are an option.
When I decided on the Finn Gadget Paddleski I was nervous about my ability to paddle it -- let alone do anything else. I hadn't paddled anything for 30 years! So it was a personal experiment.Although I had dreamed and pondered  some sort of boating activity for years, I didn't caste off until very  recently.

Now I'm an old salty dog! At this rate maybe I'll solo circumnavigate something. That's because I'm hooked and there is nothing  half so much worth doing as messing about in boats.
`Nice? It's the ONLY thing,' said the Water Rat solemnly, as he leant forward for his stroke. `Believe me, my young friend, there is NOTHING--absolute nothing--half so much worth doing as simply messing about in boats. Simply messing,' he went on dreamily: `messing--about--in--boats; messing----'